This tutorial is the second part of the Deploy Laravel 5.4 App on LEMP Stack (DigitalOcean Guide).
Before I install LEMP stack, I am going to update the package installer. To do that run the following command in the terminal. It will grab the package list and update it.
sudo apt-get update

Run the following command to install Nginx server.
sudo apt-get install nginx

After the installation, you should be able to visit your IP address and it will show the Nginx default page.

Run the following command to install MySQL on your server.
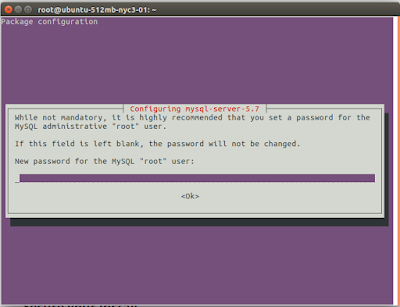
sudo apt-get install mysql-server
The above command will start the MySQL installation process. You will have to enter 'Y' and proceed. After few steps you will see the following screen. Enter root password and proceed.
Default MySQL installation is famous for insecure. MySQL has a helper script to secure the MySQL installation. To run the script type the following command in your terminal.
sudo mysql_secure_installation
You will be prompt to enter the root password. It will ask whether you want to install VALIDATE PASSWORD plugin. If you install that plugin it will check whether the password is strong enough for the security of the system.
If you think your root password is not strong enough you will be able to change it in the next step.
Next step is to remove the anonymous users. Since having anonymous users is a major security risk remove users by entering the Y key.
Normally, root should only be allowed to connect from 'localhost'. This ensures that someone cannot guess at the root password from the network. Disallow remote access since it is a security risk.
It is a good idea to remove test database. Click Y to remove it.
Finally, allow the system to reload privilege tables. Click Y to reload the table. You will get the Success. All done! message.

I'm going to install both php-fpm and php-mysql which allows PHP to communicate with MySQL. Lastly, I will install php-mbstring which is a major requirement for Laravel. Following, command will PHP version 7 as well.
sudo apt-get install php-fpm php-mysql php-mbstring
To configure PHP open the php.ini file using the following command.
sudo nano /etc/php/7.0/fpm/php.ini
Find the cgi.fix_pathinfo=1 line and change it to cgi.fix_pathinfo=0. You can use ctrl+w keys to search the texts. You will see a semicolon the left of this line. Delete the semicolon and then change the 1 into a 0 save the file and exit.

You have to restart the php-fpm changes to take effect. Run the following command to restart the php-fpm.
sudo systemctl restart php7.0-fpm
Let's configure the Nginx server. Open the /etc/nginx/sites-available/default using the following command.
sudo nano /etc/nginx/sites-available/default

Let's allow it to recognize index.php as a valid file to deliver. Let's add index.php to the list of allowed file types to deliver by default.

Let's add IP address to the server_name line. This tells Nginx which domain to respond. I am going to use an IP address since I don't want to register a new domain for this server. But if you have a domain name change the name servers to the DigitalOcean and add the domain name to this line.

Go to the location section.
#location ~ \.php$ {
# include snippets/fastcgi-php.conf;
#
# # With php7.0-cgi alone:
# fastcgi_pass 127.0.0.1:9000;
# # With php7.0-fpm:
# fastcgi_pass unix:/run/php/php7.0-fpm.sock;
#}
# deny access to .htaccess files, if Apache's document root
# concurs with nginx's one
#
#location ~ /\.ht {
# deny all;
#}
Uncomment the following section. And uncommented sections should be like following code. We want to tell Nginx to use php-fpm that we installed earlier. The second block tells Nginx to ignore .htaccess files.
location ~ \.php$ {
include snippets/fastcgi-php.conf;
#
# # With php7.0-cgi alone:
# fastcgi_pass 127.0.0.1:9000;
# # With php7.0-fpm:
fastcgi_pass unix:/run/php/php7.0-fpm.sock;
}
# deny access to .htaccess files, if Apache's document root
# concurs with nginx's one
#
location ~ /\.ht {
deny all;
}
Write the changes to the file save it and exit. You can check whether the files contain any errors using the following command.
sudo nginx -t
If it doesn't contain any error, you will get a syntax is ok message.

Now you have to restart the Nginx server using the following command.
sudo systemctl reload nginx
Now the server is ready to deploy PHP applications. You can access the part three of this series from this link.
Before I install LEMP stack, I am going to update the package installer. To do that run the following command in the terminal. It will grab the package list and update it.
sudo apt-get update

Install Nginx (Engine-X)
Run the following command to install Nginx server.
sudo apt-get install nginx

After the installation, you should be able to visit your IP address and it will show the Nginx default page.

Install MySQL
Run the following command to install MySQL on your server.
sudo apt-get install mysql-server
The above command will start the MySQL installation process. You will have to enter 'Y' and proceed. After few steps you will see the following screen. Enter root password and proceed.

Default MySQL installation is famous for insecure. MySQL has a helper script to secure the MySQL installation. To run the script type the following command in your terminal.
sudo mysql_secure_installation
You will be prompt to enter the root password. It will ask whether you want to install VALIDATE PASSWORD plugin. If you install that plugin it will check whether the password is strong enough for the security of the system.
If you think your root password is not strong enough you will be able to change it in the next step.
Next step is to remove the anonymous users. Since having anonymous users is a major security risk remove users by entering the Y key.
Normally, root should only be allowed to connect from 'localhost'. This ensures that someone cannot guess at the root password from the network. Disallow remote access since it is a security risk.
It is a good idea to remove test database. Click Y to remove it.
Finally, allow the system to reload privilege tables. Click Y to reload the table. You will get the Success. All done! message.

Install PHP and Configure PHP
I'm going to install both php-fpm and php-mysql which allows PHP to communicate with MySQL. Lastly, I will install php-mbstring which is a major requirement for Laravel. Following, command will PHP version 7 as well.
sudo apt-get install php-fpm php-mysql php-mbstring
To configure PHP open the php.ini file using the following command.
sudo nano /etc/php/7.0/fpm/php.ini
Find the cgi.fix_pathinfo=1 line and change it to cgi.fix_pathinfo=0. You can use ctrl+w keys to search the texts. You will see a semicolon the left of this line. Delete the semicolon and then change the 1 into a 0 save the file and exit.

You have to restart the php-fpm changes to take effect. Run the following command to restart the php-fpm.
sudo systemctl restart php7.0-fpm
Configure Nginx
Let's configure the Nginx server. Open the /etc/nginx/sites-available/default using the following command.
sudo nano /etc/nginx/sites-available/default

Let's allow it to recognize index.php as a valid file to deliver. Let's add index.php to the list of allowed file types to deliver by default.

Let's add IP address to the server_name line. This tells Nginx which domain to respond. I am going to use an IP address since I don't want to register a new domain for this server. But if you have a domain name change the name servers to the DigitalOcean and add the domain name to this line.

Go to the location section.
#location ~ \.php$ {
# include snippets/fastcgi-php.conf;
#
# # With php7.0-cgi alone:
# fastcgi_pass 127.0.0.1:9000;
# # With php7.0-fpm:
# fastcgi_pass unix:/run/php/php7.0-fpm.sock;
#}
# deny access to .htaccess files, if Apache's document root
# concurs with nginx's one
#
#location ~ /\.ht {
# deny all;
#}
Uncomment the following section. And uncommented sections should be like following code. We want to tell Nginx to use php-fpm that we installed earlier. The second block tells Nginx to ignore .htaccess files.
location ~ \.php$ {
include snippets/fastcgi-php.conf;
#
# # With php7.0-cgi alone:
# fastcgi_pass 127.0.0.1:9000;
# # With php7.0-fpm:
fastcgi_pass unix:/run/php/php7.0-fpm.sock;
}
# deny access to .htaccess files, if Apache's document root
# concurs with nginx's one
#
location ~ /\.ht {
deny all;
}
Write the changes to the file save it and exit. You can check whether the files contain any errors using the following command.
sudo nginx -t
If it doesn't contain any error, you will get a syntax is ok message.

Now you have to restart the Nginx server using the following command.
sudo systemctl reload nginx
Now the server is ready to deploy PHP applications. You can access the part three of this series from this link.
Comments
Post a Comment